Pages

Tuesday, February 28, 2012

DIY Curtains

You've probably seen pictures of my polka-dot curtains, and I just ran across some photos I took while doing them so I thought I should post them for you.

The whole process was:

1) Cut out fabric circles
2) Finish edges with fray check and trim
3) Cut out adhesive backing circles
4) Iron the adhesive circles to the fabric
5) Pin on the curtains and iron down.

These are my circles 

I tried to keep them all very organized. I had over 100 of them in various stages of production

I finished the edges with this fray check substance. Annoyingly, it discolored the edges, so then I had to trim the circles again, enough to cut off the black rings, but not so far in that I cut off all the fray check that had soaked into the fabric. Very tedious. 


Once I finished the fabric circles I had to cut out the same amount of circles from the iron-on adhesive.
One thing I found was that I ironed the adhesive to the circles for too many seconds, so I think the fabric absorbed all the gluey stuff. At any rate, when I went to iron the circles on the curtains, many of them did not stick, and I had to recut the adhesive backing. After much speculation I decided that I was too thorough with trying to attach the adhesive to the circles and held the heat on it too long, maybe 5-8 seconds, instead of about 4 seconds.

And of course the whole thing was incredibly time-consuming, but it was cheaper than buying 8 curtain panels, so I guess it was worth it :)


Thursday, January 12, 2012

DIY Pillowcase

Somehow I acquired this body pillow which no one else seemed to want and since it came to me with this horrid colored pillowcase, I had to take emergency action which involved making a pillowcase out of an old curtain (or dust ruffle...or something else...I really can't remember) that was very easy, but did not match my room at all. It was like a white background with a red and yellow flowery pattern. Very old-fashioned. In a boring way. Not vintage, just like some new person was trying to make it look old. 

Anyways...I had brainstorming for a long time about what kind of pillowcase to make. It was one of those things where I had so many options, I couldn't decide on anything. It also didn't help that the fabric I wanted for it cost a fortune (in my opinion). So I finally just settled on a cheap cotton fabric that was neutral and left room for my imagination. 

I had a definite idea for one side: I wanted it to have birds on it. I just had to make a bird pillowcase. So this is the result: 


Ok. I'll admit it. I love this bird. I don't know why these birds make me so happy, but they do. 

I had quite a time figuring out the other side. I originally wanted to do these mosaic-like shapes out of fabric scraps. But this was one of those times when the picture in my mind ended up nothing like the actual thing. It looked really bad. It was like 6pm at night, I had been working on this now-failed idea for a couple days, my room was a wreck, and I was reaching that point where I just had to get this finished. I have this thing for getting things done. If I'm actually in the middle of the project (and I didn't shove it under the bed for a rainy day) then I'm totally obsessed with getting it done. It becomes extremely important I finish it, no matter what. So that evening, it was essential to my sanity that I finish my pillowcase. After some mind (and internet) searching for a new idea, I decided on a theme of leaves. And this is the result: 


It looks like this pile of leaves is being swept across the pillow. It turned out so well, I can't decide if I like it or my lovely birds better. I just cut out like a billion of these shapes (after printing a templete from online) in the different fabrics. It was hard to arrange them because I tend to be very neat and organized, so I kept wanting to make it look ordered and symmetrical, then had to remind myself that they needed to be random and wind-strewn. After they were all pinned down, I just used my machine to sew down the center of each one. This resulted in a lot of loose threads and took some time, but it was worth it. 

I love my pillowcase :) 

Tuesday, January 10, 2012

Room Tour

I thought I'd just show some pictures of my DIY projects in action or other important things in my room (like my books...)


Of course, blogger is not cooperating, so even though I rotated this photo in iPhoto, I guess blogger didn't like the way I did it. So just turn your head to get the idea. :) All the books on the top shelf (the double-wide one) and all the books on the shelves on the left side I have read. The ones on the right side are my "to be read" pile. 

Next, meet my plants:

If I had to pick favorites, this would probably be it. This plant is just voracious in its growth, and I love seeing the little vines crawling towards my computer. 

In the summer this had these gorgeous hot pink flowers. While it is surviving, I think the pot is too small, so I feel bad that it doesn't have room to grow. :(

On the right is a shoot I replanted from the plant in the top photo. On the left is  a cute little plant that has pink and green leaves and occasionally graces me with tiny, purple, trumpet-like flowers.


And yes, once again blogger did not cooperate. I will repost these pictures another time...the right way. But in the meantime, you get the idea. This is a Norway Pine that my parents gave me for Christmas. The crate is really old (vintage) and super-cool. The books are just random old books I've collected over the years. The little things on the bottom shelf are brass Christmas trees and snowman that my boss made at work from some of our scrap metal. Remember those circular/flower-like paper crafts I did? One was Christmas themed, and one was printed with a black and white pattern? I usually have the black and white one on the middle shelf, but I had removed it to take pictures.

 And like I said, I'll try to figure out how to rotate these soon. I was positive that blogger had an option to rotate pictures after you had uploaded them...but I guess I was thinking of something else.

DIY nightstand (you can see the old pillowcase on the left). And also please admire the lamp. It is an awesome color and style. It was a garage sale find for $2.

My long-awaited DIY curtains. So happy to have these done. :) 

General view of my desk, curtains, etc...

Birds. On a branch. What more do I need to say? 


And an awesome Hamlet shelf. 


Wind-blowing-leaves pillowcase

Adorable-birds-on-branch pillowcase

And I think that about sums it up... :)


Random Projects

One reason I was so thrilled about the snowflakes (see previous post) was that they are super-easy and fast to put together, especially compared with another paper project I recently did. This project involved cutting (by hand) 12 paper flowers and meticulously connecting them. The completed object is beautiful but time-consuming! Apparently some fortunate people have machines to cut out their shapes...I have these things called scissors, hands, and Netflix (you can watch a lot of Alfred Hitchcock Presents while cutting out these flowers...).
Anyways, my mom bought me some fun paper to try these with, so here are the results:

Christmas theme

I can't remember what this pattern is called...I know it is some French word but I can't think of the correct term. Anyways, it is really cool :) 

And here are both of them.


So another somewhat recent project were these little fabric rosettes. I'm not satisfied with how I did the backing on them, the felt doesn't feel very secure, so the rosette tends to flop around from side to side, wherever it is pinned. I need to improve the method of attachment, but other than that, they turned out quite nicely.


For Christmas some friends sent us a box of delicious pears. They were packaged up very nicely with these round sheets of green tissue paper around each one. When my mom was ready to throw the box away, she noticed the abundance of this paper and saved it for me. I loved the color and it didn't take long for me to find a project. I made these little flowers out of each piece. The biggest circle (the one in the back) is about 3" across, then I had 2 circles that were 2.5" and one that was 2". I just layered the circles, scrunched them up a little bit and pinched the centers enough to make more of a flower shape rather than just several flat circles put together. I secured the creases, pinches, and scrunches, with matching thread and then sewed a little pearl in the center. 


I think I did 10 of them altogether, and then attached them to a length of 1" wide green satin ribbon. I already had these small nails at the top of bookcase on each side, so I just had to tie the ribbon around each of the nails and I had a fun addition to my bookshelf! 


The hats were a recent addition...they had been hanging on my Hamlet shelf, but after adding the snowflakes to it, I felt that it was too cluttered and one couldn't appreciate the beauty and simplicity of Hamlet (and my snowflakes) with a lot of things. I have gotten some negative feedback from family members about my hats hanging here...but for the time being, I don't know where else to put them. And I do think they look kinda nice there :) 


Snowflakes!


Our church has a family fun night every month where they open up the gym for games, order pizza, and just hang out. Last month we also added a craft to the evening and made these beautiful Christmas ornaments. Somehow I was appointed to find a craft for our January fun night and this is what I found. I like this because 1) it is incredibly easy, 2) it is incredibly fast, 3) it looks incredibly complicated, 4) it has incredible potential for variations.


This is my original prototype: about 22" from point to point


Then I decided to make 4 miniature ones to put in my empty picture frames. And of course,  to be consistent, I had to make them out of Hamlet...

These turned out to be about 3.5" from point to point. 
This size was devilish to work with, the pieces were so tiny I couldn't hold on to them to keep everything together while the glue was drying.


I'm excited to imagine the possibilities for this idea. You could do this in summery colors for a more flower-like appearance or neutral colors for year-round use. At first I struggled to figure out how to make it because the tutorial I was following just did not make sense. I eventually made sense of it by comparing several different explanations and finally grasping the concept. When I make these next, I'll do a tutorial as well, so it will at least make sense to my crazy brain :) 

Thursday, September 8, 2011

Rosette Tutorial

This is part of a much bigger project, but I'm going to be making a bunch of these really cute fabric rosettes and thought I'd share how I do it: 


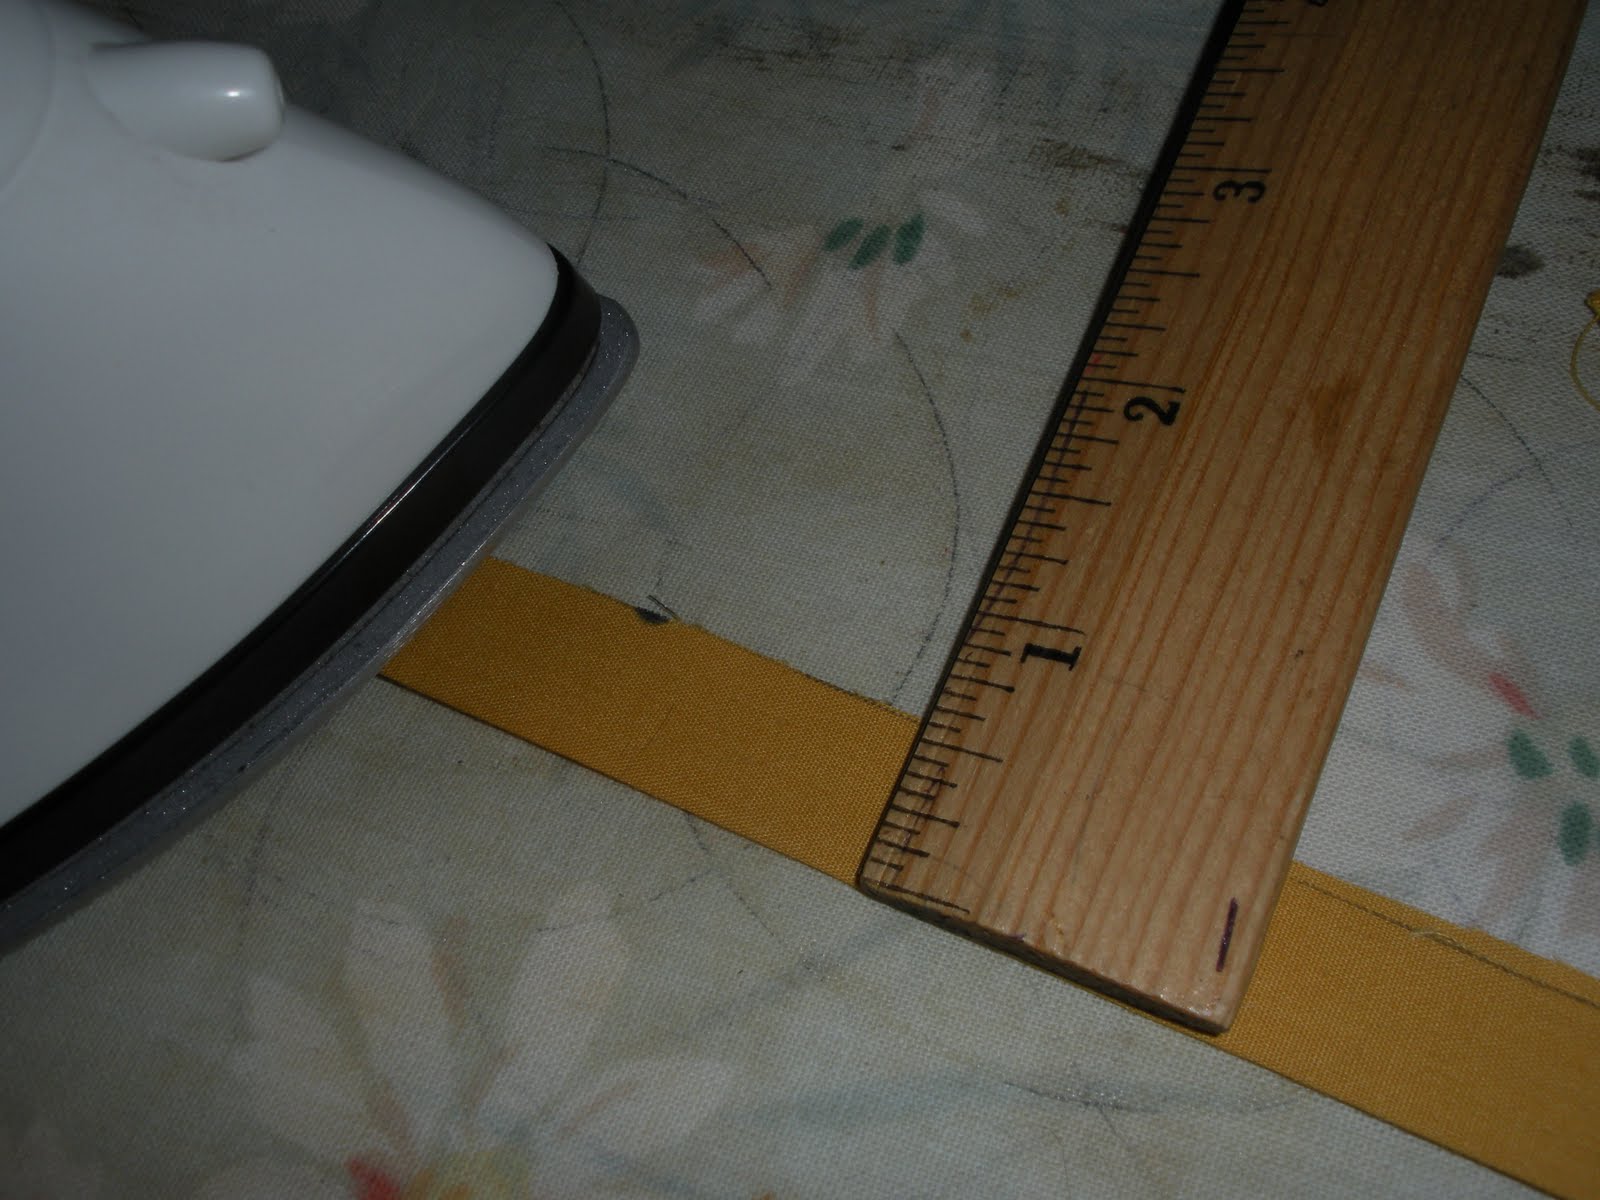
Start with a 1" wide piece of a fabric. Mine was about 18" long. It is fine to make it out of several strips sewn together if you don't have a piece long enough.


Fold strip in half and iron. The dark spot on the fabric is where my pen leaked while measuring the piece. 


Find a 1/2" strip of cardboard. Mine was just from a normal sheet of cardboard and so was 11" long. Wrap the strip around it on an angle. I wasn't happy with how I started mine...there must be a better way to make it start angled, rather than even...but I just gradually angled mine and it turned out okay. 


When the whole strip is wrapped around the cardboard, iron over it once or twice to make the folds stay. Then carefully slip the fabric off the cardboard so it lays freely. This is the hardest part. I like to slip one end off just an inch or two and pin it down (I'm using my ugly, stained ironing board as a table) so I don't have to worry. The strip will want to unwrap itself, so you have to go slowly and make sure it is all flat and laying the way it was on the cardboard. 


This is the other end of it. I like pull it out a little bit (it will be wrapped pretty tightly over the cardboard). Just go slowly and stretch it carefully so everything remains in place. When you're happy with it, pin both ends down. 


Iron it down. I angle the iron and go up and down over the strip instead of running the iron length-wise over it because the fabric has a tendency to get messed up under the iron and you don't realize it until it is too late. This way you can take it just a bit at a time. 


Find a pencil and roll the strip around the pencil. It is a little tricky at first, but gets easier. 


Finished pencil roll.


This is where you get to decide how your rosette will look. Mine ended up a little looser than I had anticipated. I did a little cluster of them several months ago that are very tight and I was going more for that look, but I think I like the roll uncoil too much when taking it off the pencil. So...slip the roll off the pencil and either let it loosen up or keep it tight depending on how you want the final rosette to look. I did pull mine a little tighter than it is in the above picture. You can do a lot to tweak it right now.


This is a side view of it. Pretty cute, eh?


If you're wondering what to do with the loose end, I just wrap it over the bottom of the rosette. This works best if you follow the folds in the fabric already. In the picture the strip is wrapped over the edge at the pre-ironed crease. I just folded the raw end under itself and pinned while I worked more on the front. 


I like to iron mine down slightly and "smoosh" them a little bit. 


To finish the back, I cut a small circle out of brown felt (using the thread spool as my pattern) and after sewing the end down on the back (the part that had been pinned on) I sewed this circle over it. I'm not sure how I'm going to use these flowers yet, so I made two small parellel slits in the felt so I could tie a ribbon to it, attach it to something, etc...


You can't really see the slits, but they are there. The felt just gives it a nicer backing, stabilizes the shape, and gives you something so you can attach it to other objects. 

Finished rosette! 


Finished rosette on a nicer background. I know I should have put something else in the picture to give you an idea of the size, but this complete rosette turned out to be about 1 1/2" across. It can be done a lot tighter, and you can always add fabric (or cut it off) if you need to adjust the size. 

I really like this one and it turned out very nice, imho. :) 

I mentioned my room decor...mainly the branch on the wall with bird pillows and a nest. I'm thinking of making 6-8 of these rosettes and hanging them from different branches. I think it would help make it more whimsy and cute than "oh, look, she hung a branch on her wall and stuck some birds on it...that's kinda cheesy." By hanging rosettes from it, I'll be saying, "I'm not trying to look like I have a real branch with real birds on it, but I just thought it was cute." Haha, does that make sense? 

Anyways, I may not end up doing that, but I can always put this on a ribbon and use it as a headband or some other cool thing. I love how versatile and adorable these are! 

Wednesday, September 7, 2011

Bird Love

I can't remember where I saw this idea, but it was this little bird pillow. Think Twitter bird, except soft and squishable. My room is mostly abstract/modern but it has some natural influences too. The picture above my bed is a kinda quirky branch/leaf painting. The colors of my room (brown, green, gold) are obviously natural colors too. I'm trying to balance the funky/modern look with a nerdy/vintage feel and the whimsy/fun natural designs. A lot to attempt!
I was inspired to carry out my idea after seeing these dinosaur pillows from See Kate Sew. I'm not a fan of dinosaurs, but seeing all the different patterns and ideas made me think of how much I could do with a simple bird pattern.
I plan to have a tutorial here this week, but I'll start with some pictures of the birds I've done so far. I found this really neat branch that I'm going to hang on the wall and my sister had an old birds nest she gave me to put in it too, so that's going to be uber-cute with my birds.

It makes me inexplicably happy to see my bird contentedly sitting in her nest. 

And this one is reversible! 


This one has a coarser/tweedy fabric that I think is really cute. 


Doesn't this make you want to sew your own bird?!